When your main form of travel is your feet and travel is your life-force, then the health of your feet becomes a top priority.
The old saying, “If momma ain’t happy, ain’t nobody happy!” rings true if you replace “momma” with “your feet”. For this reason, I have tried with many trials and errors to find a way to move about in the world that will keep my feet–and therefore myself and those around me–quite happy.
Without going into all of the nitty gritty details, I thought I’d share a few tips and tricks that work for me. Of course, everyone’s feet are different but maybe these simple things will make a difference for you if you’ve experiences foot woes. There is a wealth of knowledge available both on the net and in print which is why I’ve decided to keep it simple and hit a few key notes. For further reading though, I highly suggest the book Fixing Your Feet by John Vonhoff.
Other than important things like checking the inside of your shoes for seams that may cause blisters, not hiking in cotton socks (which don’t wick away moisture and cause blisters easier), keeping your feet and the inside of your shoes clean and dirt-free, I will name four things in particular that are on the top shelf of my tips and tricks for whispering to those pesky blisters and keeping them at bay.

A thru-hiker’s foot at mile marker 1650.0 on the Pacific Crest Trail. Don’t let your feet turn out like this, y’all!
(Photo courtesty of pbase.com)
—-Prevention is, by far, the best way to keep blisters away. I have a three-part system that almost guarantees that blisters won’t poke their ugly faces on my lovely feet. So far, on the Appalachian Trail, having walked 850 miles, I can only speak of 3 blisters that very temporarily tainted my feet, mainly because of unrelentingly wet conditions.
- First, socks. My personal preference for comfort, durability, and the reduction of friction between the toes that form those nasty toe blisters are Injinji Performance Toesocks. I have become so devoted to these feet-saving socks that I walked about 400 miles, refusing all other socks until I could find my beloved Injinji. Some people opt for wearing two pairs of socks–a liner and a sock over it–, but I find that my feet get too hot which creates sweat and the moisture leads to blister hot-spots. Injinji’s “Trail 2.0” and “Run” socks in wool are my favorite for stink-free cushion, breathability, and blister-reduction. (Not only are Injinji toesocks profound at preventing blisters, their staff members are most personable and extremely helpful. A special thanks to the Regional Sales Coordinator, Tim Dalton!)
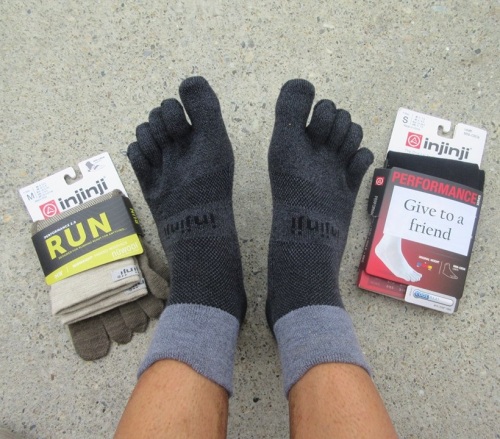
New socks are like walking on clouds!
- Second, protective foot cream. For this, I turn to FootKinetics HikeGoo. Blisters form because of friction, so the idea is to reduce friction and, thereby, reduce blisters. (Note: FootKinetics line of Goo products are also great for reducing chafing!) Although there are other types of friction barriers, I choose HikeGoo because of their great customer service (Thank you, Rick!) and the fact that this stuff works! You can use it in wet or dry conditions, depending on your needs, but I mainly use it for wet circumstances.
Here’s my drill for using it: I wake up in the morning and know that it is pouring rain or that I will have a river crossing or that it is hot out and my feet will sweat; basically, I know that my feet will be wet in one way or another. That’s my cue to rub the wondrous Goo onto my feet, paying special attention to between the toes, the metatarsal pads, and my heels. I do this first thing in the morning to allow my skin to soak it up before I set off for the day. The Goo acts as a barrier to keep your feet from absorbing the water that it will inevitably be exposed to in given conditions, thereby preventing blisters and macerations caused by the skin softening and rubbing to the point of no return. Also, at the end of a very wet day, I dry my feet out and apply a layer of the Goo before I go to bed as prep for the following day.
Thank you, FootKinetics, for helping us get through the bogs and rivers of Maine, and the rain throughout the trail!
- Third, tape. One strong rule to which I abide is this: Always STOP at the first burning feeling of a blister forming. If I don’t follow this rule, inevitably the fire on my feet gets out of control and a blister appears, laughing at me for my negligence. When a blister appears, it can be hard to focus on anything else, even with the most amazing beauty around.
So, what to do when you stop? Apply tape to the area. My former self who walked hundreds of miles along the Mediterranean coast with nothing but a backpack would slap some duct tape on the blister and call it good, only to have the tape peel off and the blister to form anyway. Now, there’s the simplest solution: Leukotape. This miraculous tape is backed with rayon, is latex-free, and uses zinc oxide as an adhesive which, I can firmly attest to, stays in place for days on end, even when wet. (Note: it is mainly an athletic tape for prevention and occurrence of injuries, but works great for blister-prevention as well!)
Simply tear off a small square of the tape and place it over the hot spot to reduce friction in the area and keep the blister from forming. After this, you will need to figure out what is causing the blister in the first place and address that issue, but in the mean time this tape speaks calmly to angry skin and keeps it from ruining your hike.
Personally, I don’t want to carry around a whole roll with me, so I cut a 2″ section off of a drinking straw and wrapped about 1′ of tape around it. Ultralight, baby!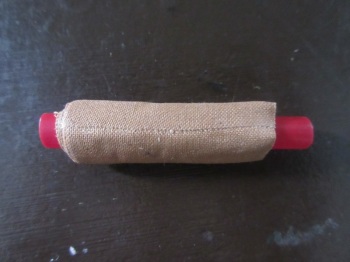
Leukotape wrapped around a small section of straw; a necessity in my first-aid kit!
4. I understand, sometimes your blister whispering skills won’t always be able to work for you and the dreaded feeling of a hot spot will become kindled on your feet and turn into a full blown bonfire of a blister! For this, after the hike is done for the day, I call upon a needle and thread, that of which I also keep in my first aid kit. (Note: Do not pop the blister if you plan on hiking more that day because it could make it worse and open it up to risk of infection!)
For this step, I will reference the person from whom’s blog I learned the technique; Erik the Black’s Backpacking Blog, in this particular post.
“Wait till evening, then thread a sterile needle and run it through the blister, leaving the thread in place. As you sleep, fluid will leech out along the thread. When you wake up in the morning it will be flat and dry like a callous.”
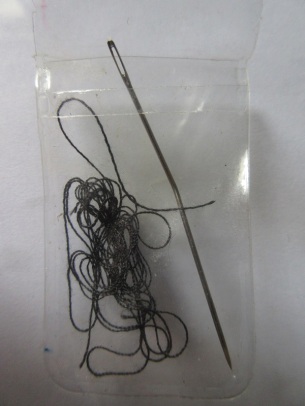
Along with a needle, thread goes into my first-aid kit solely for blisters; I carry floss for sewing repairs.
These, for me, have become the magic that keeps my feet happy and my travels plentiful.
Now go forth and practice the art of whispering to the beastly blisters that may never be on your feet!— Virginia


Saw your register entry up on Blue Mountain somewhere. Will follow Liver and Onions (yes, I know you don’t use trail names) on the rest of your journey. Keep on hiking.
EarthTone
Hey EarthTone!
Thanks for checking out our site via one of the trail registers!
Hahaha Well, David is using “Liver” but I am not so sure about “Onions”…Then again, what is liver if it’s not accompanied by onions? 😉
Take care and thanks for following us!
Pingback: Talus in Wonderland: A Summer of High Routes | unbound routes